
Host Your Stuff - Part VI
Let's make a blog!


Hello, friends! I hope you're having a good day, and I really hope you're enjoying this series. I think it is really important for people to at least know what they can do outside the walled gardens of big tech. Today, we're going to, paradoxically, leverage two big tech platforms to run our own blog. Why? Because:
- Writing is an excellent exercise.
- This method is free (mostly).
- This method is easy (mainly).
- This method is a gateway drug to other things (surely).
I've been "blogging" one way or another since the Blogspot days. And before that, but that wasn't called "blogging" back then. The overwhelming majority of things I wrote were read by no one, and that's probably going to be your case, too. And that's fine: you're doing this for the hell of doing it. You will learn something, and, if you keep with it, the benefits of writing consistently will be clear as day.
So, let's grab our tool bag and get this show on the road. For this recipe, you're going to need:
- Eleventy - Our static site generator;
- GitHub - This will manage our posts;
- Cloudflare Pages - Where we'll host our blog;
- That domain name you bought in part I.
And that's about it. This post is really way more verbose than necessary, but bear with me. It looks more complicate than it really is. With the exception of the domain, everything listed will cost you zero dollars. And it works pretty well, too: this is literally all I use to host CrankySec.com. When we're done, you'll have a blogging platform that you control, and you will have—at the very least—a passing understanding of git, node.js, and some DevOps? Gitops? Maybe? Anyway, let's go for it and worry about semantics later.
First thing you'll need to do is create a GitHub account, if you don't have one already. Let's do that. Head over to GitHub, and create an account, naturally.
By the way, go to your Settings page, click "Password and authentication" under "Access", and enable two-factor authentication:
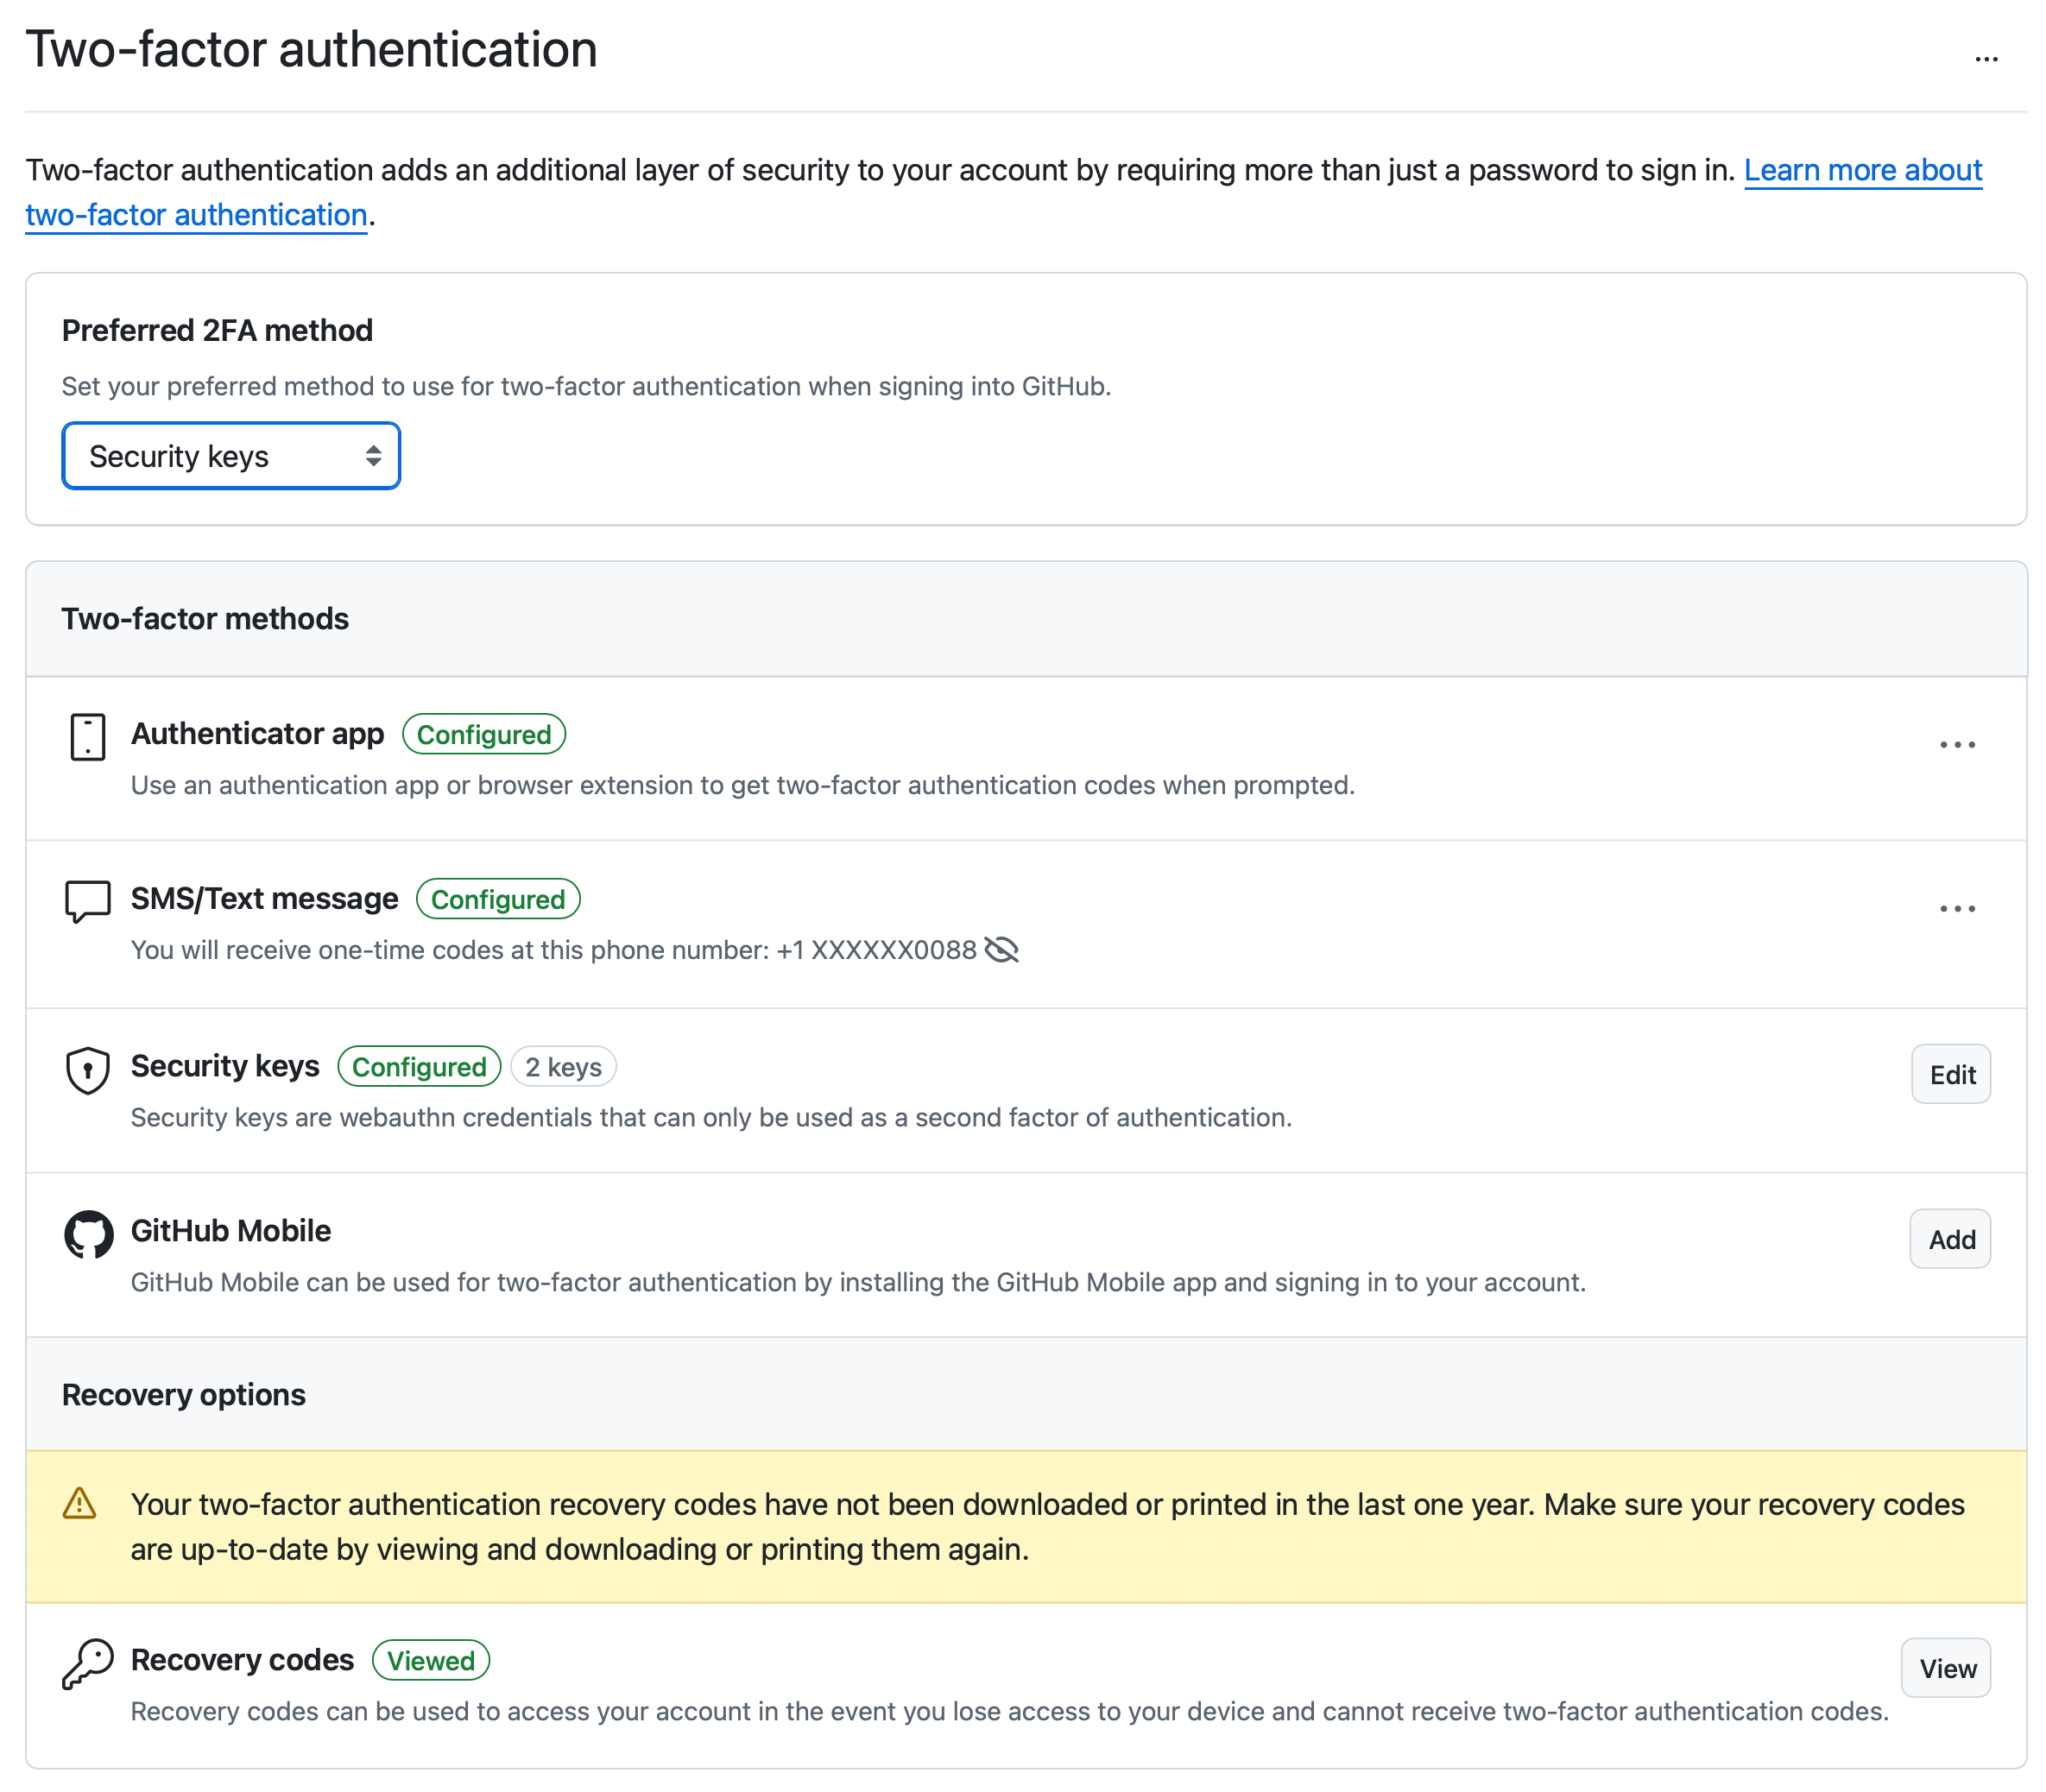
I'm using Security keys in this example, but you can use an authenticator app like Authy or Google Authenticator. If possible, avoid SMS/Text message authentication. If not possible, it's better than no two-factor at all. You should be doing this to every single account you have, really.
Next, you'll need to create a GitHub Repo. That's short for repository. That's short for "a place on GitHub to store your code and/or other types of documents that uses git as a versioning system." This is where we're going to store our blog's structure. There's a shortcut for that! Just go to https://repo.new and you'll see something like this:
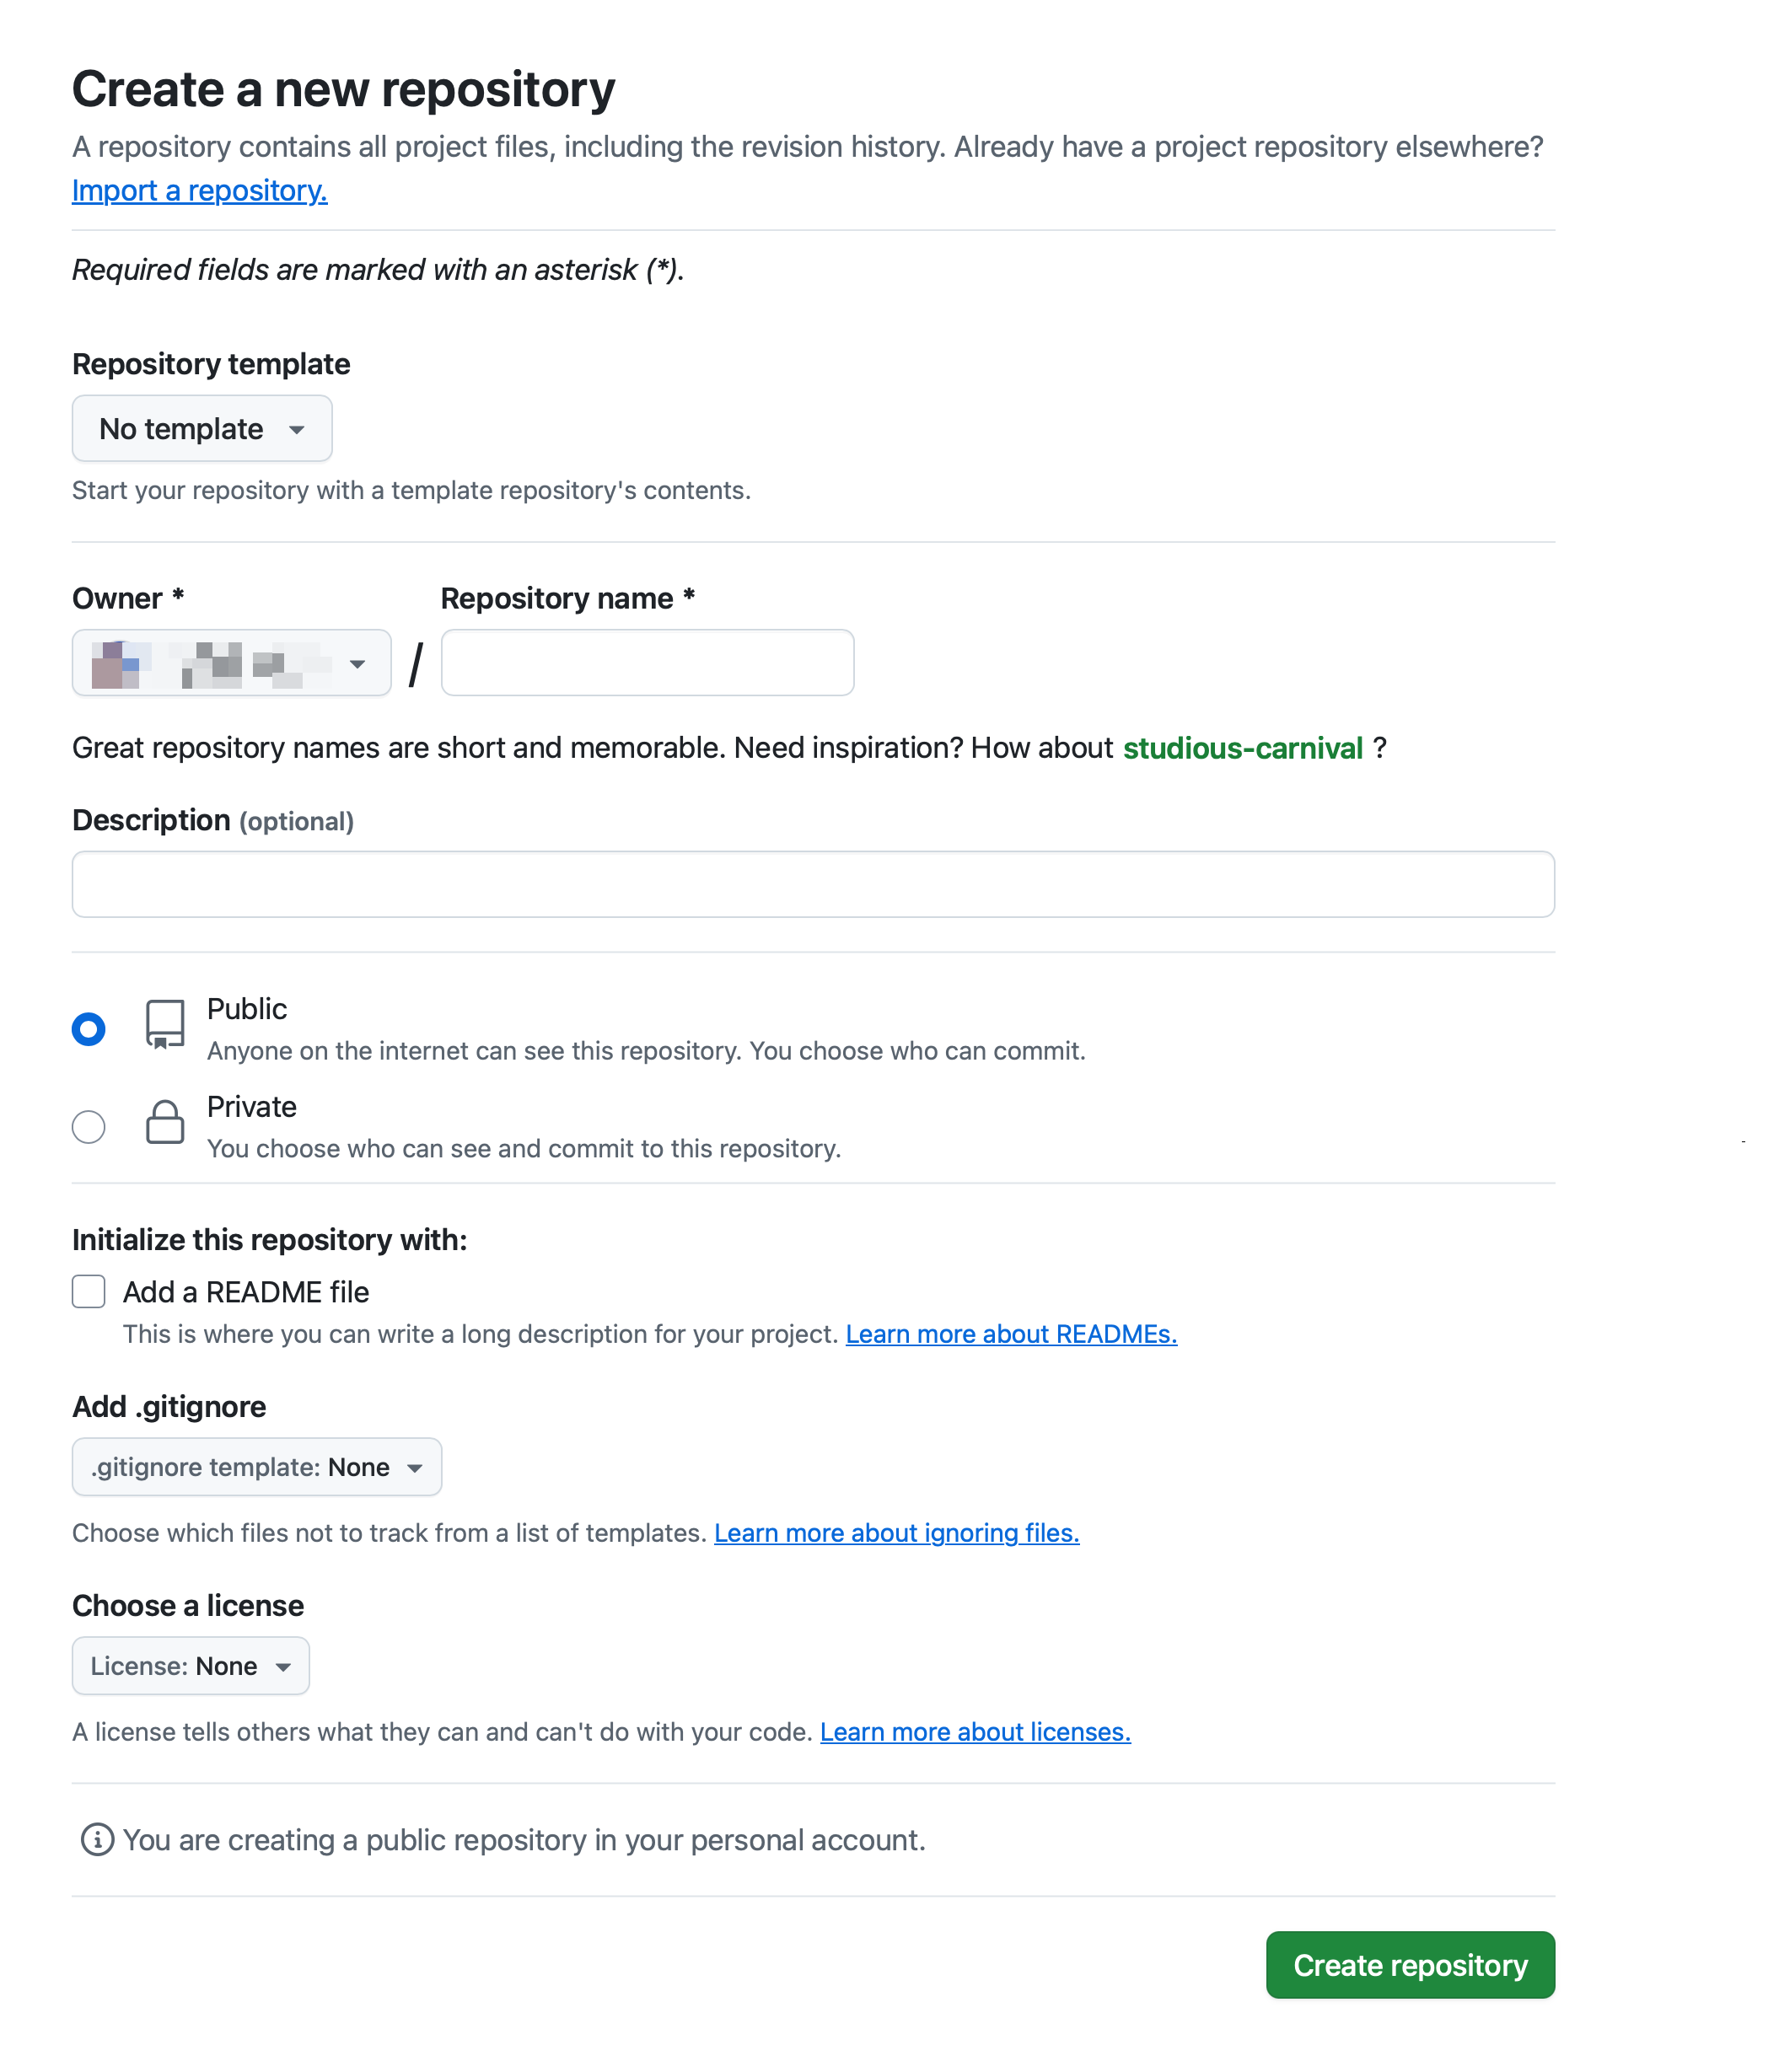
Unless you have multiple GitHub identities, you should only have one "Owner": you. Give your repo a name, make it Private, and you can leave the rest as is. Click the "Create repository" button, and you're off to the races.
For this exercise, we're going to pretend that our GitHub username is "bardownski", and our repository name is "ferda". GitHub creates repositories using a https://github.com/yourgithubusername/githubrepo structure. So, the full URL of our GitHub repo is https://github.com/bardownski/ferda
Right! You have your GitHub account, and your brand new repository. Now what? Now we go back to our old friend, the terminal emulator. Why don't you give Ghostty a try, eh? Yes, go back to part III if you need. We'll wait.
All good? Nice! So, we need to tell our local computer, the one we're using to write our blog posts, where it should send your stuff when you push it to GitHub. As you can probably have guessed, git is involved. You should be ok with macOS and any Linux distribution designed for normal humans. On Windows, if typing git into the terminal doesn't work, you'll need to install it. Just go here, and follow the instructions. The defaults should be fine.
Git can get real messy real fast, but don't worry. You can always count on this website. You can also delete everything and start over.
Head to the terminal, and let's set things up. We need a directory to hold our work, and we need to inform git that this particular directory we're creating is the one we're going to use as the local copy of our stuff. The remote copy of our stuff will be on GitHub. I am going to assume that you know how to create a directory and get to it via terminal. Let's say our work directory is blog, and it's sitting under our home directory /Users/scarv, so the full path is /Users/scarv/blog.
/Users/username is the typical macOS home directory. Linux is probably /home/username, and Windows will be something like C:\Users\username. Typing pwd on macOS, Linux, and Windows will tell you your current directory. Cool. We have git installed, and we have our directory open in our terminal emulator. We need to tell git where to go when we tell it to send our stuff to GitHub. To make this process a bit easier, let's first tell our local git who we are, and clone our GitHub repo to our local machine:
git config --global user.name "Scarlett Cavendish"
git config --global user.email "sc@crankysec.com"
git clone https://github.com/bardownski/ferda
This will make a local copy of our GitHub repo. Then, we can tell our local git that we want to use this remote GitHub repository as a... uhhh... remote repository:
git remote set-url origin https://github.com/bardownski/ferda
git branch -M main
Let's see if everything is preem:
git remote show originThis should yield something like:
* remote origin
Fetch URL: https://github.com/bardownski/ferda.git
Push URL: https://github.com/bardownski/ferda.git
HEAD branch: main
Remote branch:
main tracked
Local branch configured for 'git pull':
main merges with remote main
Local ref configured for 'git push':
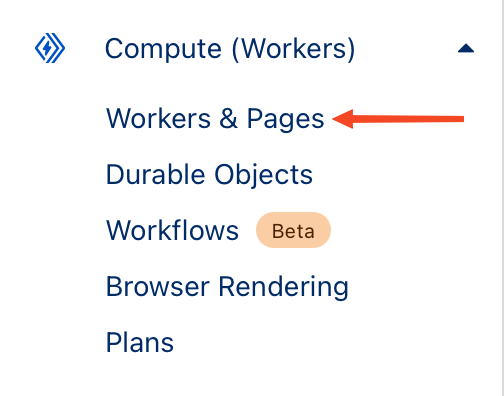
main pushes to main (up to date)Classy stuff! We're well on our way. Let's link our GitHub to our Cloudflare now! Go to your Cloudflare dashboard, and click on "Workers & Pages" under "Compute (Workers)" on the left side of the page:
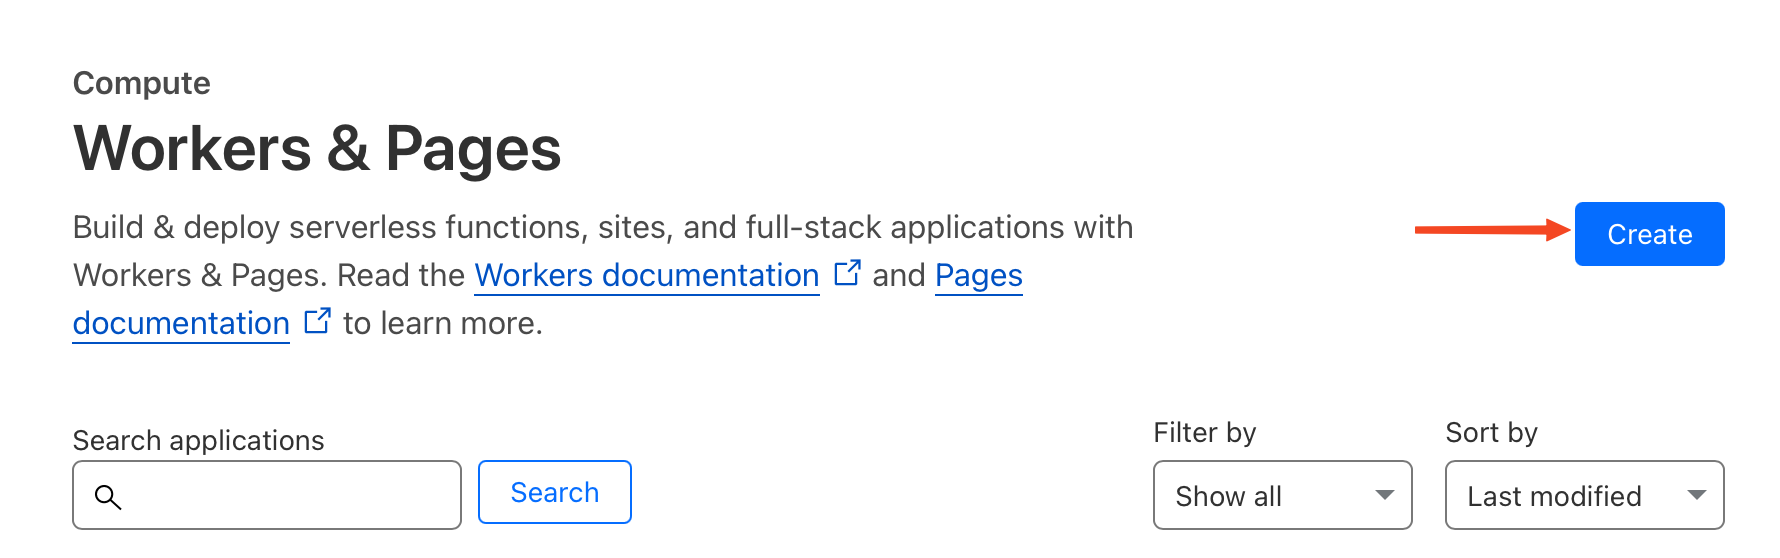
From there, click the Create button:
Select "Pages", and "Connect to Git":
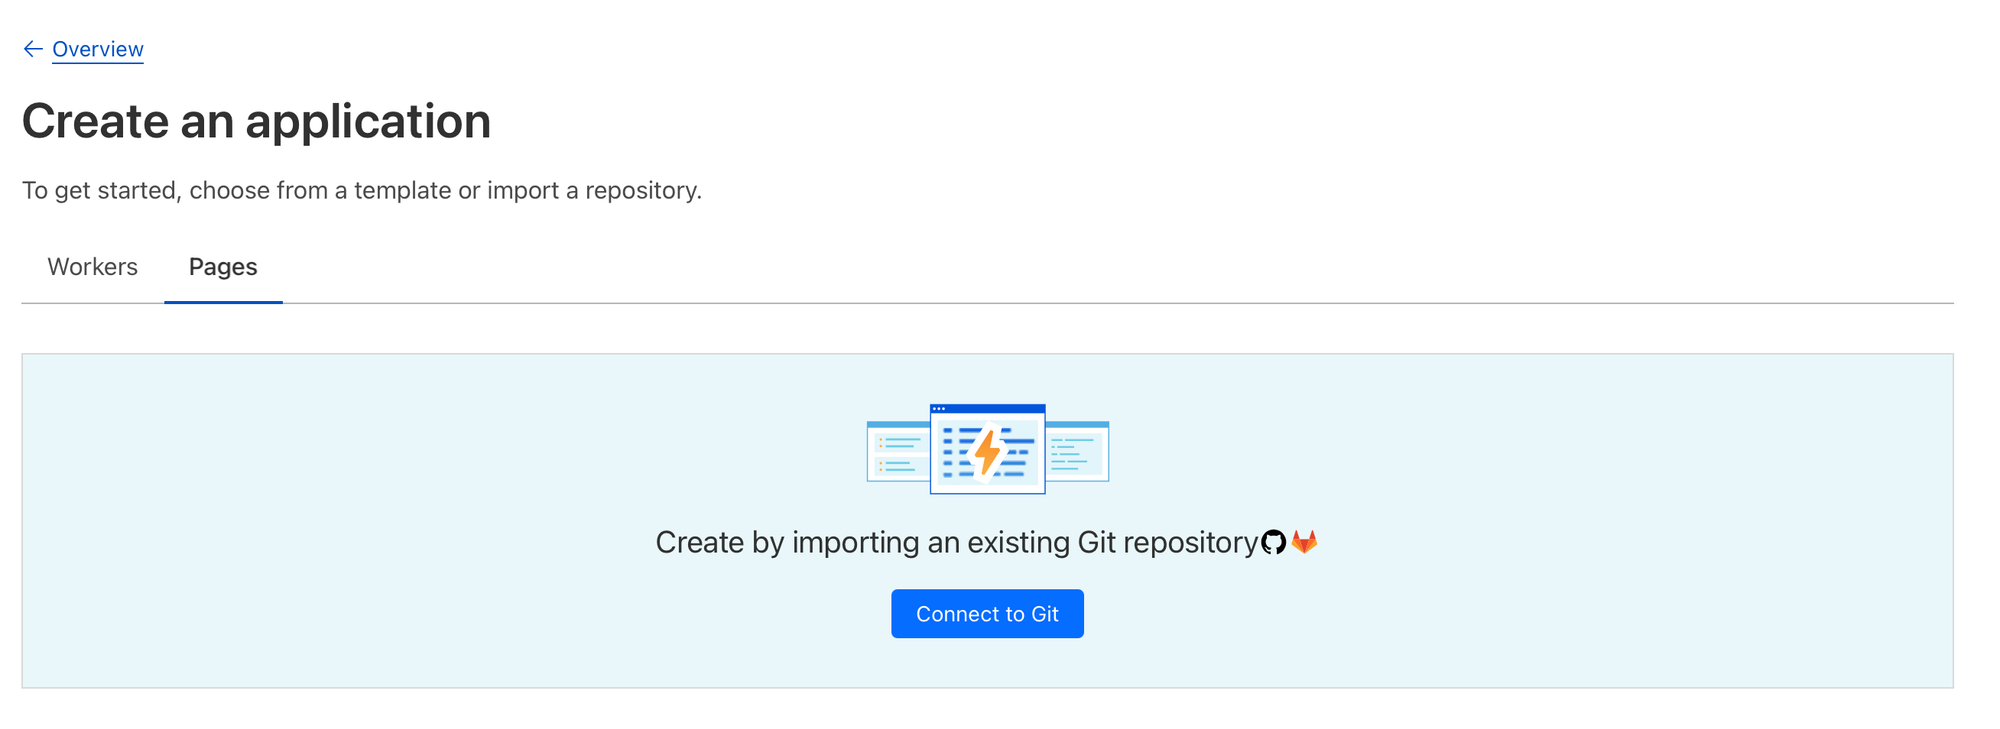
You will see that your Cloudflare account is not yet linked to your GitHub account because Cloudflare says:
"If your repository is not shown, configure repository access for the Cloudflare Pages app on GitHub."
So, click that link, and allow Cloudflare to access your GitHub. Select your GitHub repository and, in the Set up builds and deployments section, select Eleventy as your Framework preset. This should populate the relevant options with the following values:
| Configuration option | Value |
|---|---|
| Production branch | main |
| Build command | npx @11ty/eleventy |
| Build directory | _site |
Let's pause for a moment and talk about what this thing is doing. The idea behind this is very simple: you write some Markdown, tell your local git to keep track of the new files, and, when you're happy with the results, you tell your local git to push your stuff to your remote git, a.k.a. GitHub. Your local directory will be copied to GitHub. Other magic stuff happens, but you don't need to know that right now. Then, Cloudflare realizes that your GitHub repo has changed, since, you know, you pushed new files to it, and the Cloudflare worker will run the build command and move the output of Eleventy to Cloudflare Pages, where people can access it.
To try and make it even simpler: you create a text file containing your post, send it to GitHub, this will tell Cloudflare to use Eleventy to build a whole site for you, and then Cloudflare will move this whole site to Cloudflare Pages. The only things you need to worry about after the groundwork is done are:
- Write a post.
- Push to GitHub.
That's it. It really looks way more complicated than it is. We need to install Eleventy locally now. Without going into too much detail, Eleventy needs a JavaScript runtime, and that's a good job for something like Node.js. Head to the Node.js download page, and look for the instructions that apply to your particular system: macOS, Linux, Windows, or... AIX? Sure, why not? You can either copy the commands to download and build Node.js, or download a pre-compiled binary.
I'm using macOS, so my download screen looks like this:
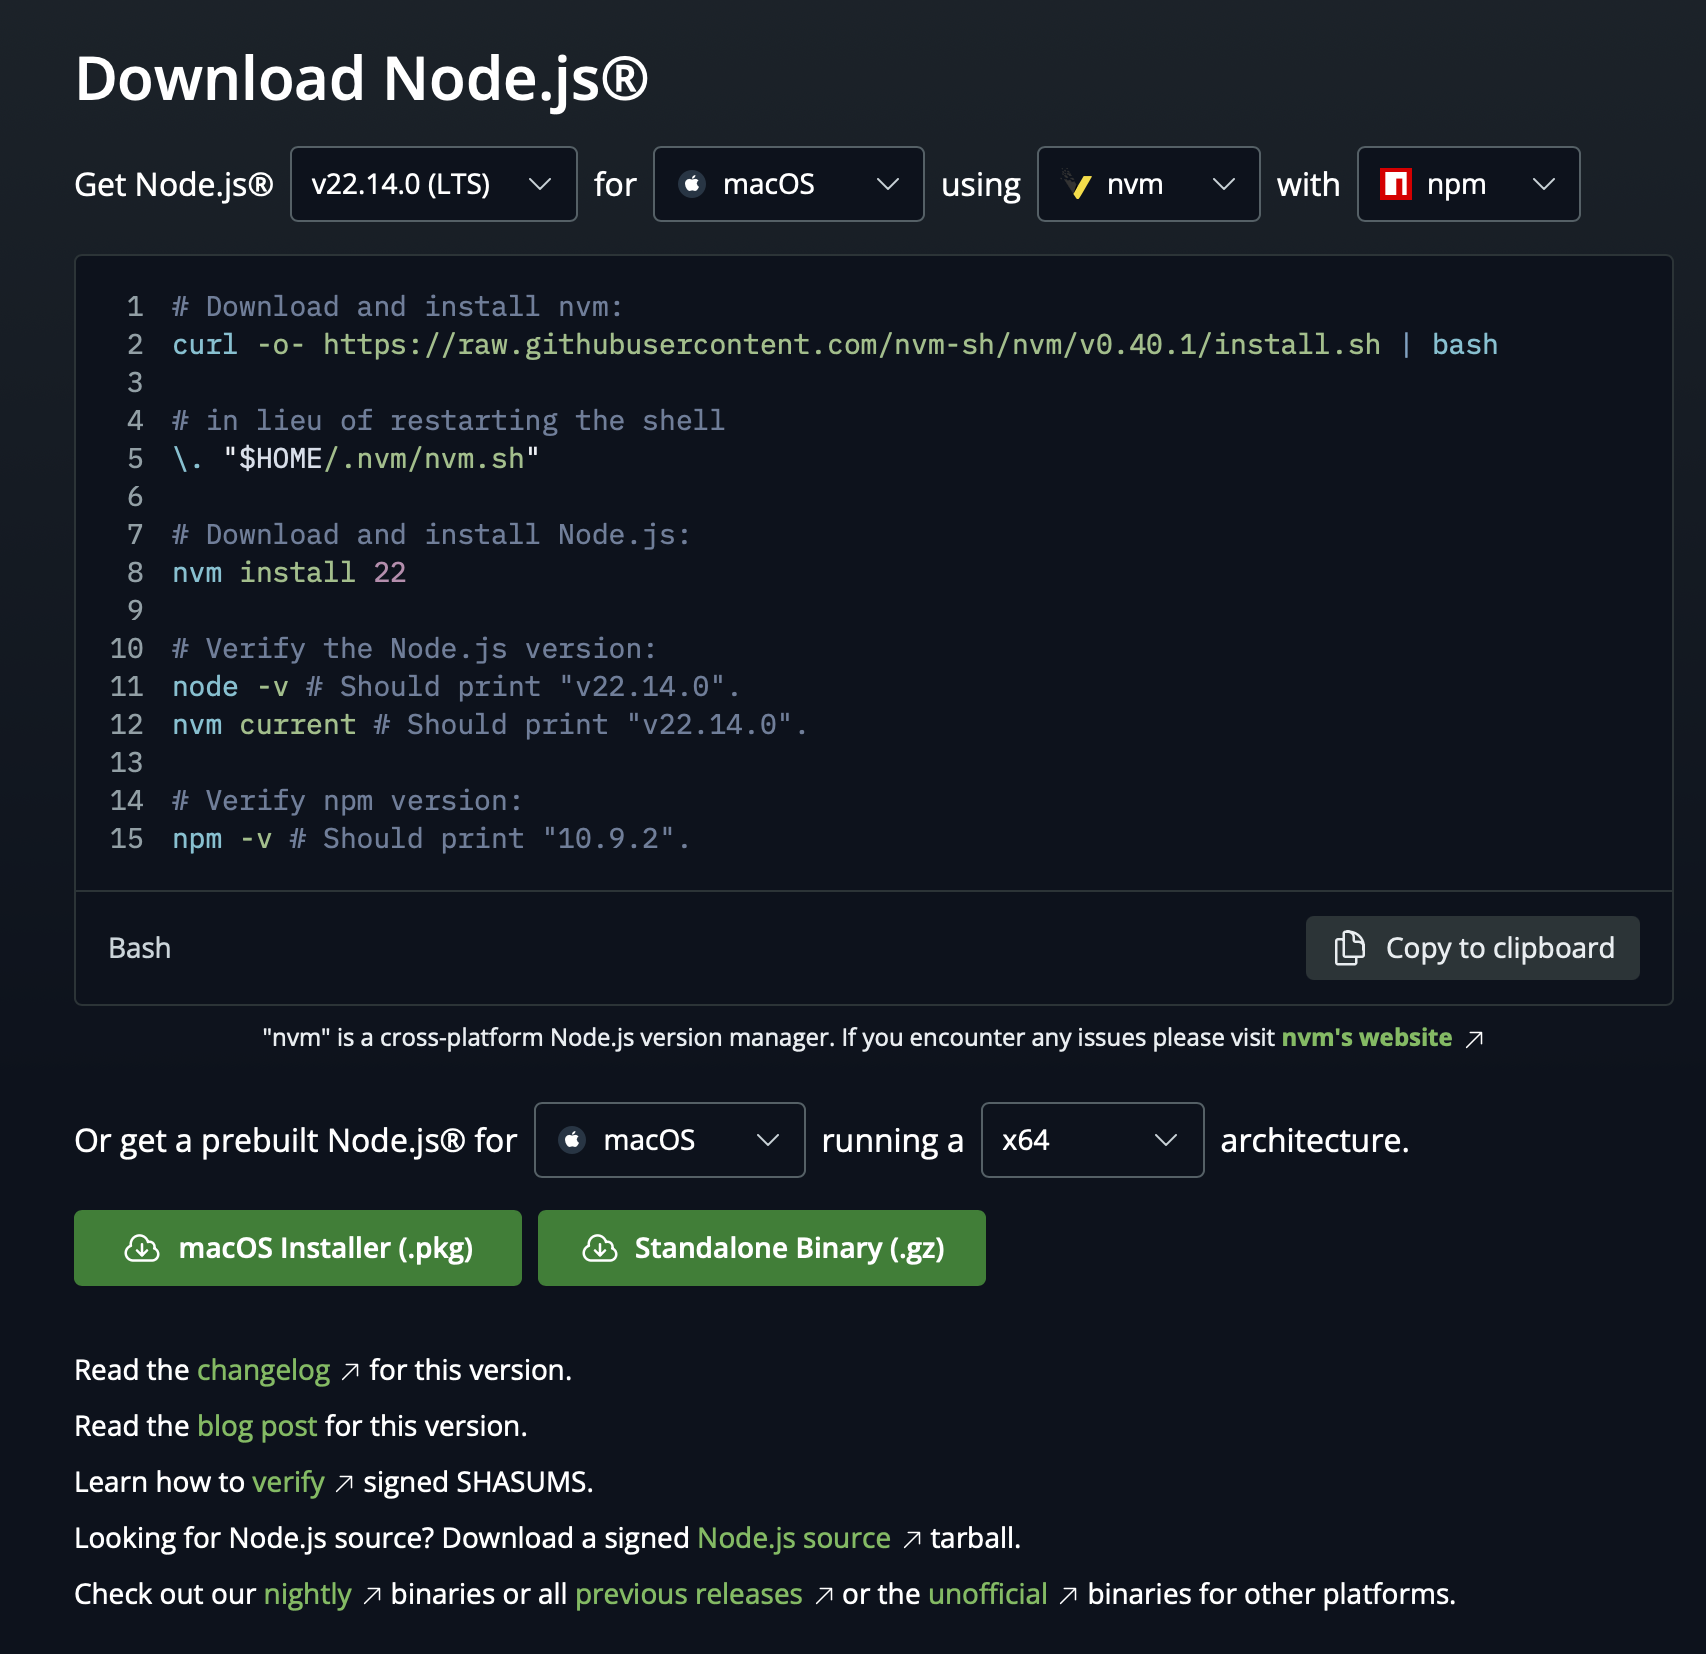
Make sure to have "with npm" selected. Once you're done installing Node.js, we can move on to Eleventy. We are going to use one of Eleventy's Starter Projects as the foundation of our blog.
You can think of those Starter Projects as "themes." Kinda. If you squint. The reality is that those are not themes: the Starter Projects are whole websites you can customize and deploy with Eleventy. Let's do that by:
- Opening a terminal emulator and going to our blog directory:
cd /Users/scarv/blog- Running the following commands:
git clone https://github.com/11ty/eleventy-base-blog.git .
npm installgit clone command. It's important! It will tell git to clone the 11ty base blog starter project into the current directory instead of creating a new directory! That should take care of installing Eleventy. If you want to try it out, run this command from your blog directory:
npx @11ty/eleventy --serveThis will build the website and spin up a local web server with your site that you can access by firing up a browser and going to http://localhost:8080

You should see something like this:
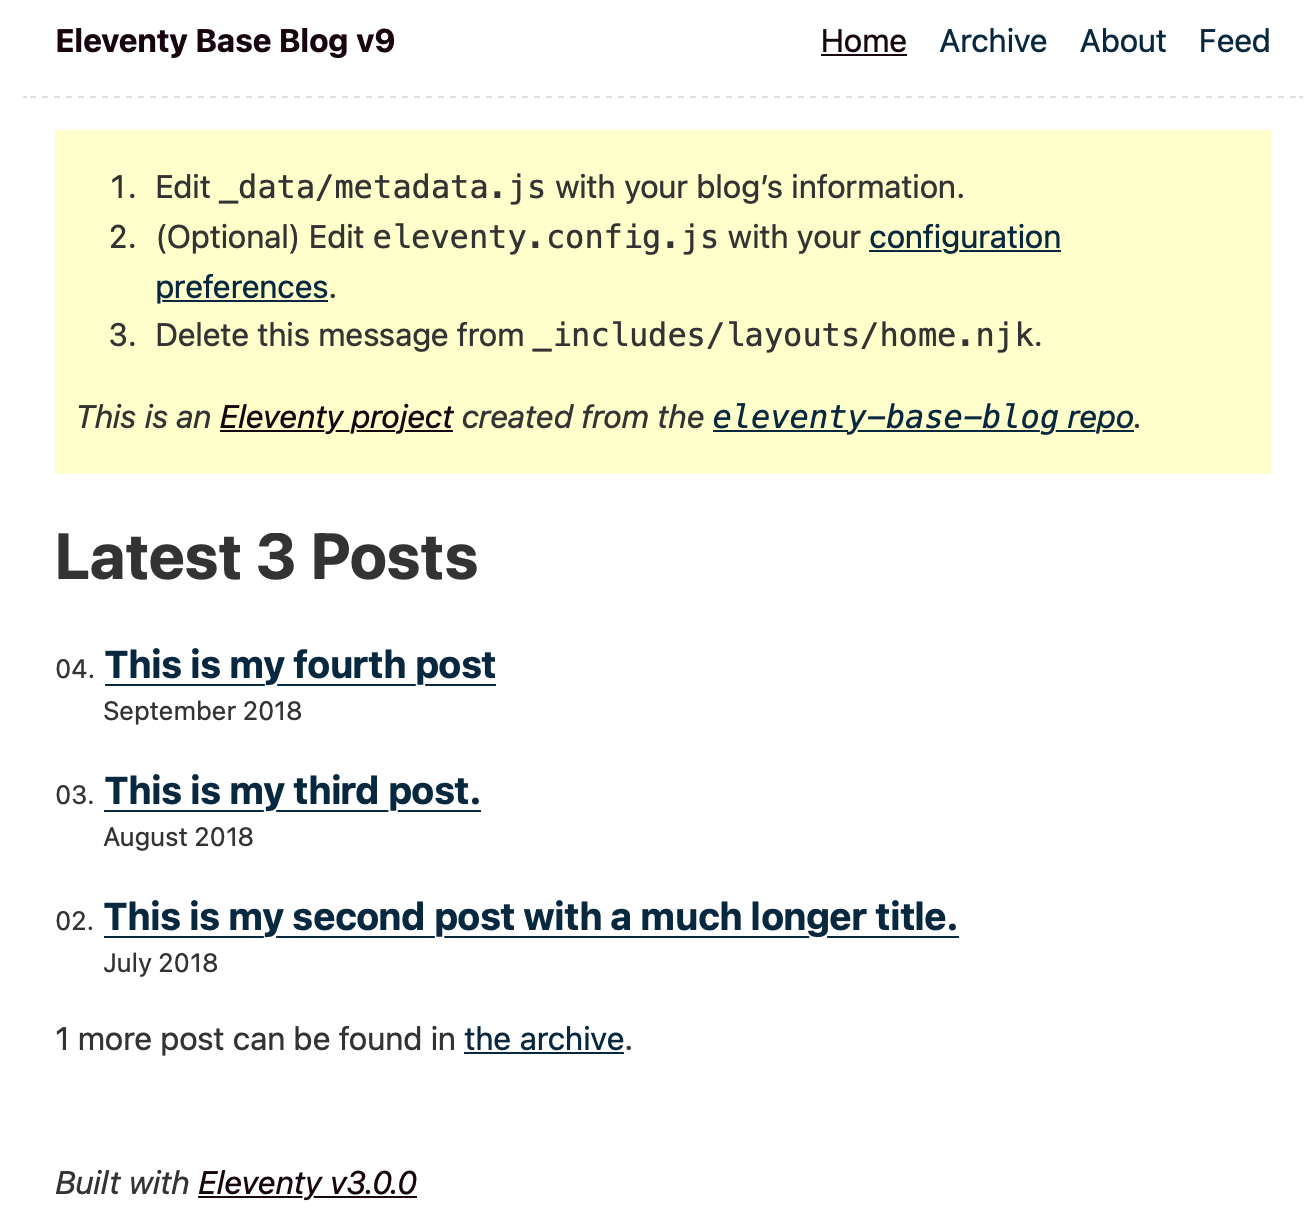
Well done! You now have a blog running! Locally. And it doesn't do much. And it's telling you to do some stuff. Time to do some poking around, friends! Let's stop the local web server by going back to the terminal, and hitting Ctrl + c.
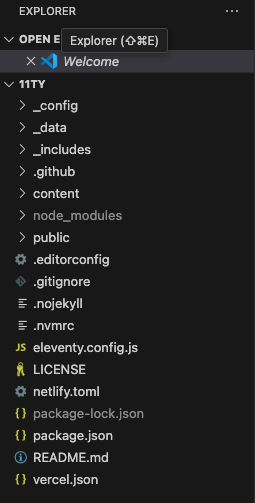
I don't expect everyone here to be vim or emacs aficionados. You can absolutely use either, of course. Or Neovim. Or Helix. Or Notepad. As long as you have a functional text editor, you're good. Text editors, not text processors. Not Word, not Google Documents, not Pages. Let's make this real simple for the folks who don't deal a whole lot with those, and go with Visual Studio Code.
Don't be mad if you have strong opinions about this. I do, too. If you're new to this, let's use VS Code. It's available for multiple platforms, it's easy to download, install, and run. Once you're ready, open VS Code, and go to File > Open Folder. Find the folder containing your Eleventy (that's /Users/scarv/blog here), and you'll see the directory structure of Eleventy's base blog:
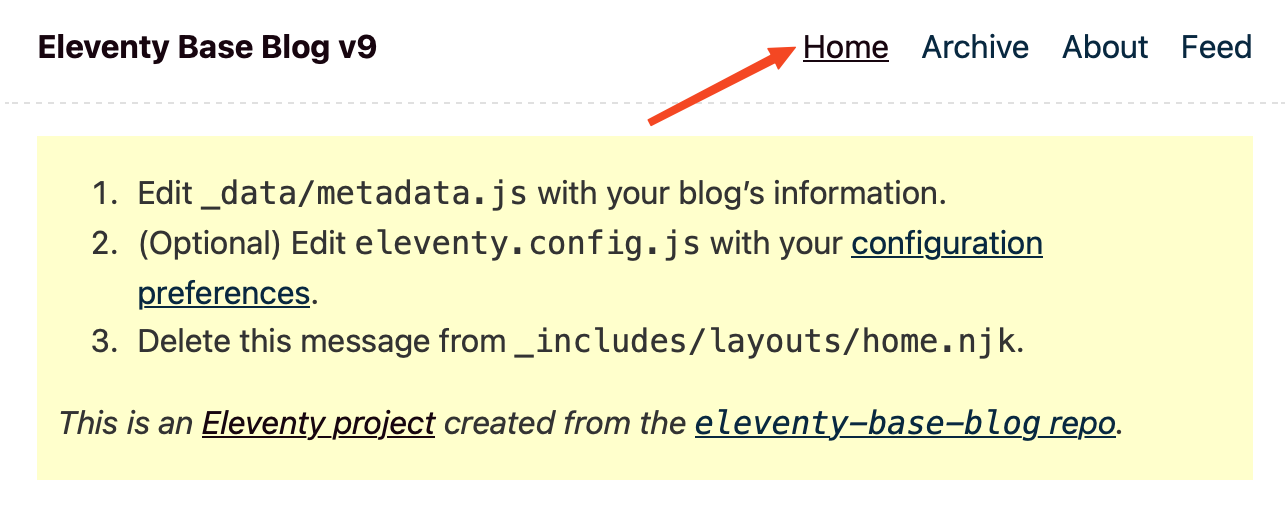
Eleventy was nice enough to tell us to:
- Edit
_data/metadata.jswith your blog’s information. - Edit
eleventy.config.jswith your configuration preferences. - Delete this message from
_includes/layouts/home.njk.
Let's do that! Go to the _data directory and open the file metadata.js
export default {
	title: "Eleventy Base Blog v9",
	url: "https://example.com/",
	language: "en",
	description: "I am writing about my experiences as a naval navel-gazer.",
	author: {
		name: "Your Name Here",
		email: "youremailaddress@example.com",
		url: "https://example.com/about-me/"
	}
}
Change the stuff between quotes, and save the file. Remember the domain you bought? You can have your blog at something like https://blog.mydomain.com. We'll get to that in a minute. If you didn't buy a domain (you should), leave the url fields as they are; we'll get back to that, too. Your metadata.js
should look something like this:
export default {
	title: "My excellent blog!",
	url: "https://blog.mydomain.com/",
	language: "en",
	description: "I'm learning!",
	author: {
		name: "Scarlett Cavendish",
		email: "sc@crankysec.com",
		url: "https://blog.mydomain.com/about-me/"
	}
}
Next, Eleventy tells us to (optionally) edit eleventy.config.js. There's not a whole lot there that you need to change for things to work. The defaults are fine, but have a look anyway. Maybe change the feed plugin metadata (lines 65 to 70) so your Atom/RSS feeds read a little nicer:
metadata: {
			language: "en",
			title: "Blog Title",
			subtitle: "This is a longer description about your blog.",
			base: "https://example.com/",
			author: {
				name: "Your Name"
			}
		}
Save that file, and let's go to the last step: editing _includes/layouts/home.njk.
---
layout: layouts/base.njk
---
<!-- Delete this block, which will also remove the component CSS from the bundle -->
{%- css %}{% include "public/css/message-box.css" %}{% endcss %}
<div class="message-box">
	<ol>
		<li>Edit <code>_data/metadata.js</code> with your blog’s information.</li>
		<li>(Optional) Edit <code>eleventy.config.js</code> with your <a href="https://www.11ty.dev/docs/config/">configuration preferences</a>.</li>
		<li>Delete this message from <code>_includes/layouts/home.njk</code>.</li>
	</ol>
	<p><em>This is an <a href="https://www.11ty.dev/">Eleventy project</a> created from the <a href="https://github.com/11ty/eleventy-base-blog"><code>eleventy-base-blog</code> repo</a>.</em></p>
</div>
<!-- Stop deleting -->

{{ content | safe }}
The base blog is kind enough to let us know where to start deleting, and where to stop. Delete the lines as instructed, and save the file.
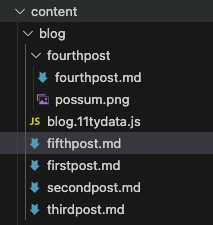
Now, let's get to the things Eleventy's base blog doesn't tell you right off the bat. First, you need to know that your blog posts have to be saved to the content/blog directory:
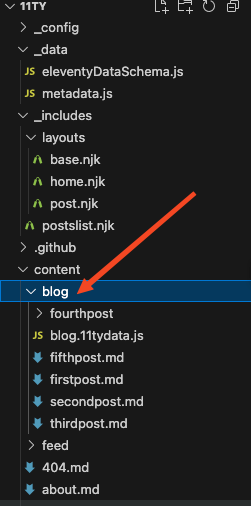
So, you'll save your blogposts to this directory. And, for the sake of simplicity, you'll write your blogposts in Markdown.
As you can see from the default base blog page, there are four posts there already:
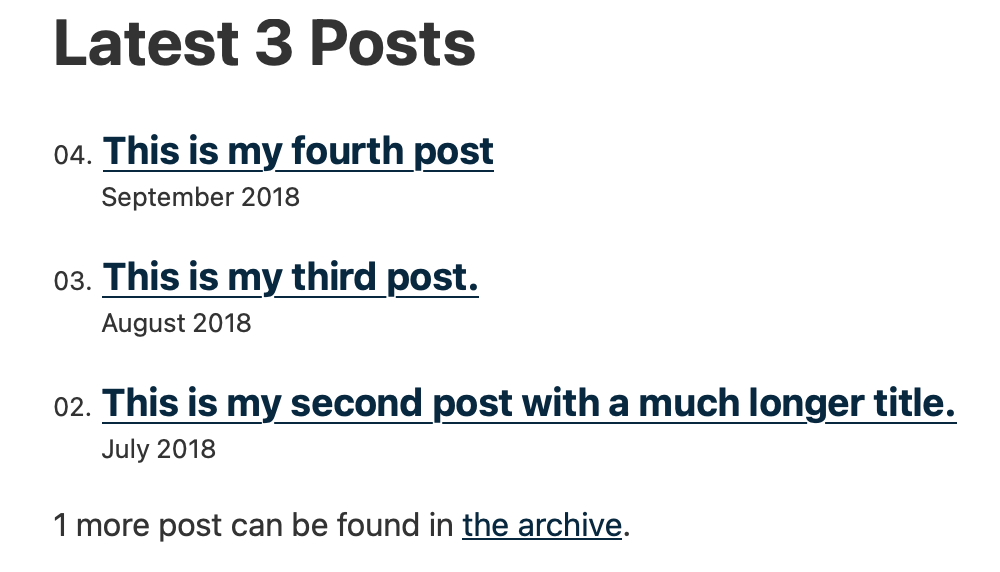
Three are shown, one is in the archive.
fifthpost.md there. If you look closely, you'll see that it's an example of a draft post. Let's change that so the blog shows the last ten posts instead of the last three. This is configured by changing the constant numberOfLatestPostsToShow in index.njk under the content directory:
Right now, numberOfLatestPostsToShow is set to 3. Let's change that to 10.
---js
const eleventyNavigation = {
	key: "Home",
	order: 1
};

const numberOfLatestPostsToShow = 3;
---
Before
---js
const eleventyNavigation = {
	key: "Home",
	order: 1
};

const numberOfLatestPostsToShow = 10;
---
After
Save the file. Notice that this is the "Home" section of your blog, and order: 1 tells Eleventy that this is the first item on the navigation menu:
"Archive" is item number 2, "About" is number 3, and "Feed" is item number 4. Since we're here, let's change the "About" section. Open the about.md file under content, and write your "About" page:
---js
const eleventyNavigation = {
	key: "About",
	order: 3
};
---
# About

I am a person that writes stuff.
Leave the stuff between the --- alone, and write whatever you want below the second ---:
---js
const eleventyNavigation = {
	key: "About",
	order: 3
};
---
# About This Most Excellent Blog!

I am learning this stuff! It's great because I get to play with:

* Git
* Eleventy
* Cloudflare Pages
It stands to reason that, if you create a new file called links.md and write something like:
---js
const eleventyNavigation = {
	key: "Links",
	order: 5
};
---
Some links I like:

[Crankysec.com](https://crankysec.com)
[32x33](https://32x33.institute)
Eleventy will create a new menu item right after "Feed" named "Links", and the Markdown you wrote would be transformed into HTML.
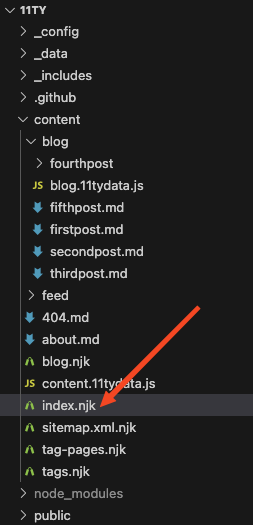
Cool! Onto the posts, then! As we've mentioned before, the base blog comes with four example blog posts. Those are all under the blog directory, that is under content:
The file names don't matter for ordering purposes. It's not in alphabetical order or anything like that (mostly). Posts are ordered by date, and that's handled by something called Front Matter. Let's take a look at firstpost.md and check out the Front Matter there:
---
title: This is my first post.
description: This is a post on My Blog about agile frameworks.
date: 2018-05-01
tags: another tag
---
Front Matter for firstpost.md
Front Matter goes between the two ---.
Let's write a post from scratch to see what it looks like:
---
title: A brand new post!
description: This is a brand new post, guys!
date: 2025-03-06
tags: excellent posts
---
# Hello!

Welcome to my blog! This is cool!
Here we have the Front Matter telling Eleventy the details of this blog post, and some Markdown with our actual post. Let's save this as huzzah.md under content/blog.
Visual Studio Code happens to have a terminal emulator built-in, and that's useful. Go to the Terminal menu, and click on New Terminal:
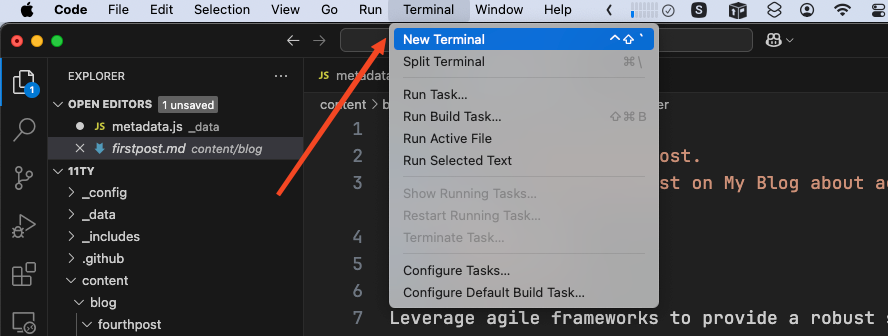
You should be in the right directory already. If you haven't, save all the files, and run npx @11ty/eleventy --serve. This will build your site, and serve it locally. You can access it by going to http://localhost:8080. After the changes we've made, the blog should look something like this:
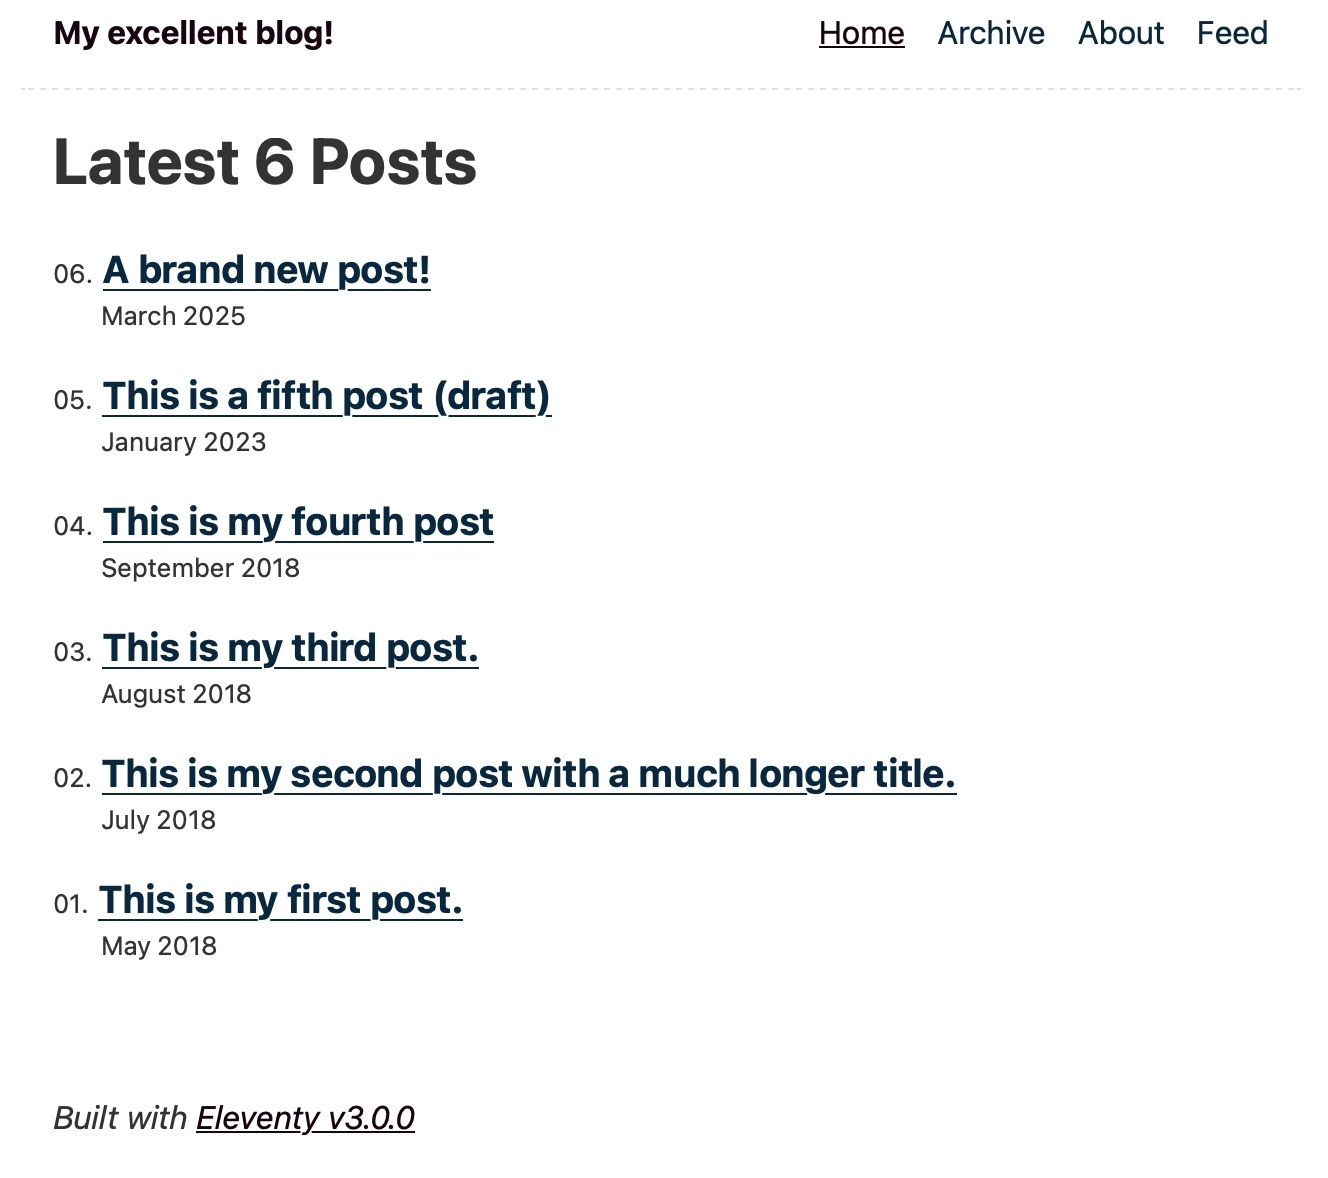
Our new post is there! And we have more than 3 posts showing! And we got rid of that yellow box! And we have changed the name to "My excellent blog!" We are unstoppable!!
From here, we are pretty much ready to git push our blog to GitHub. Head back to your Visual Studio Code, go to the terminal panel, and stop the local web server with Ctrl + c. Type the following:
git add .
git commit -m "My first deployment!"
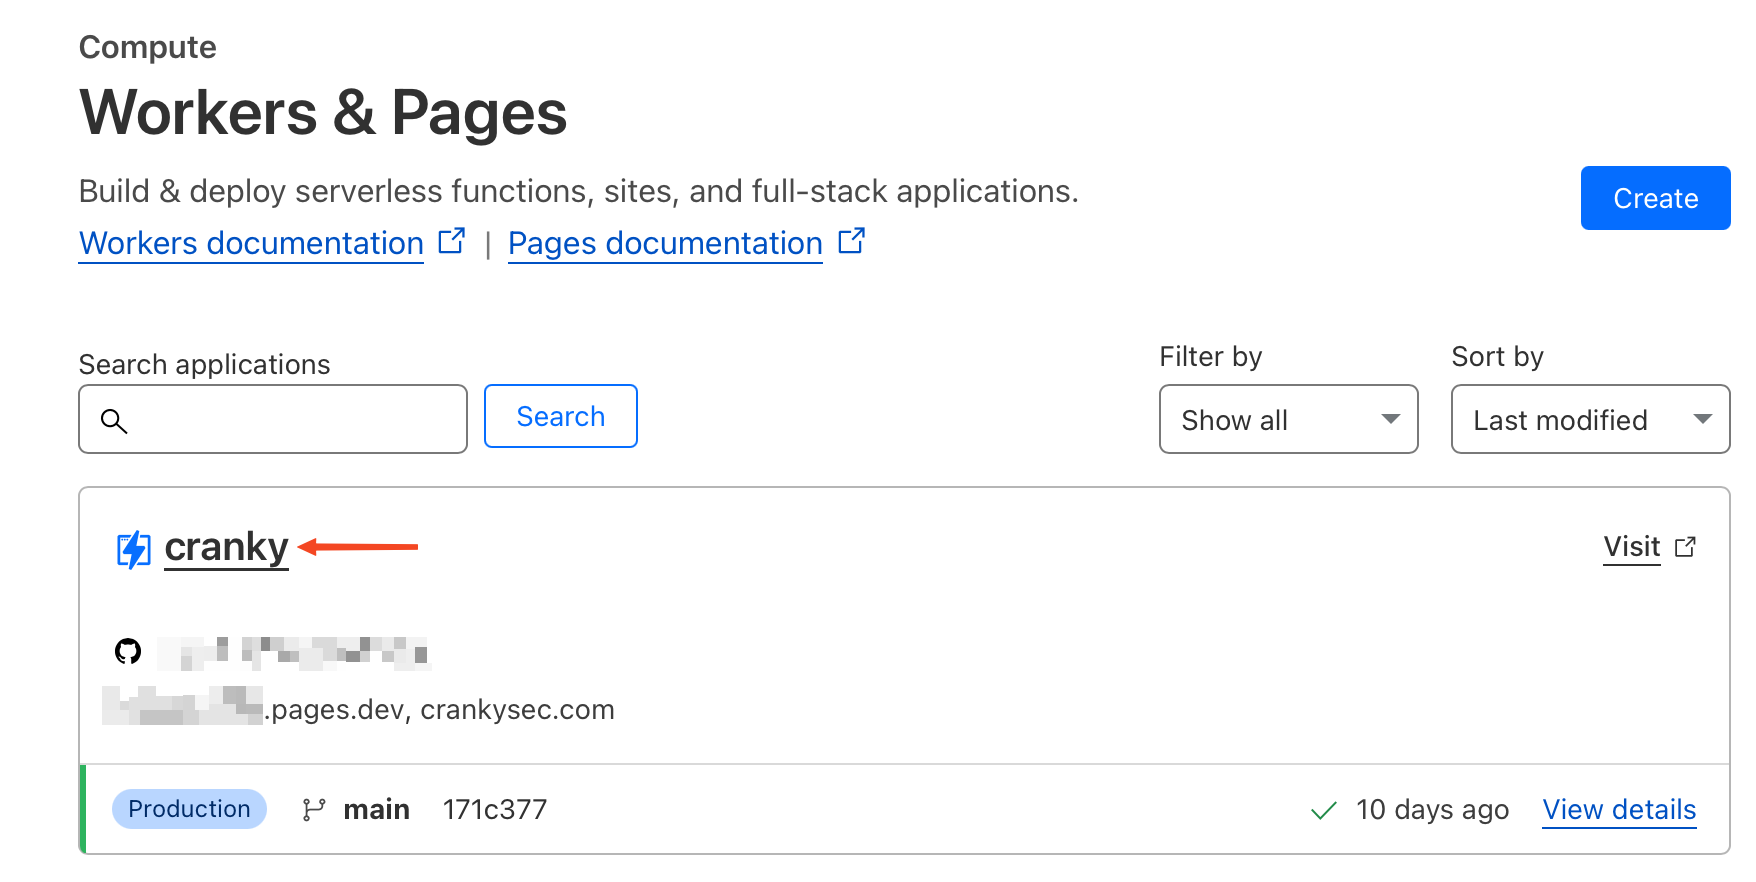
git push You might be asked to log into your GitHub account, so do that. If everything goes according to plan, Cloudflare should notice that your repository has changed, build your site, and store the results at Cloudflare Pages! Head to the Cloudflare Dashboard and go to the "Workers & Pages". You will see something like this:
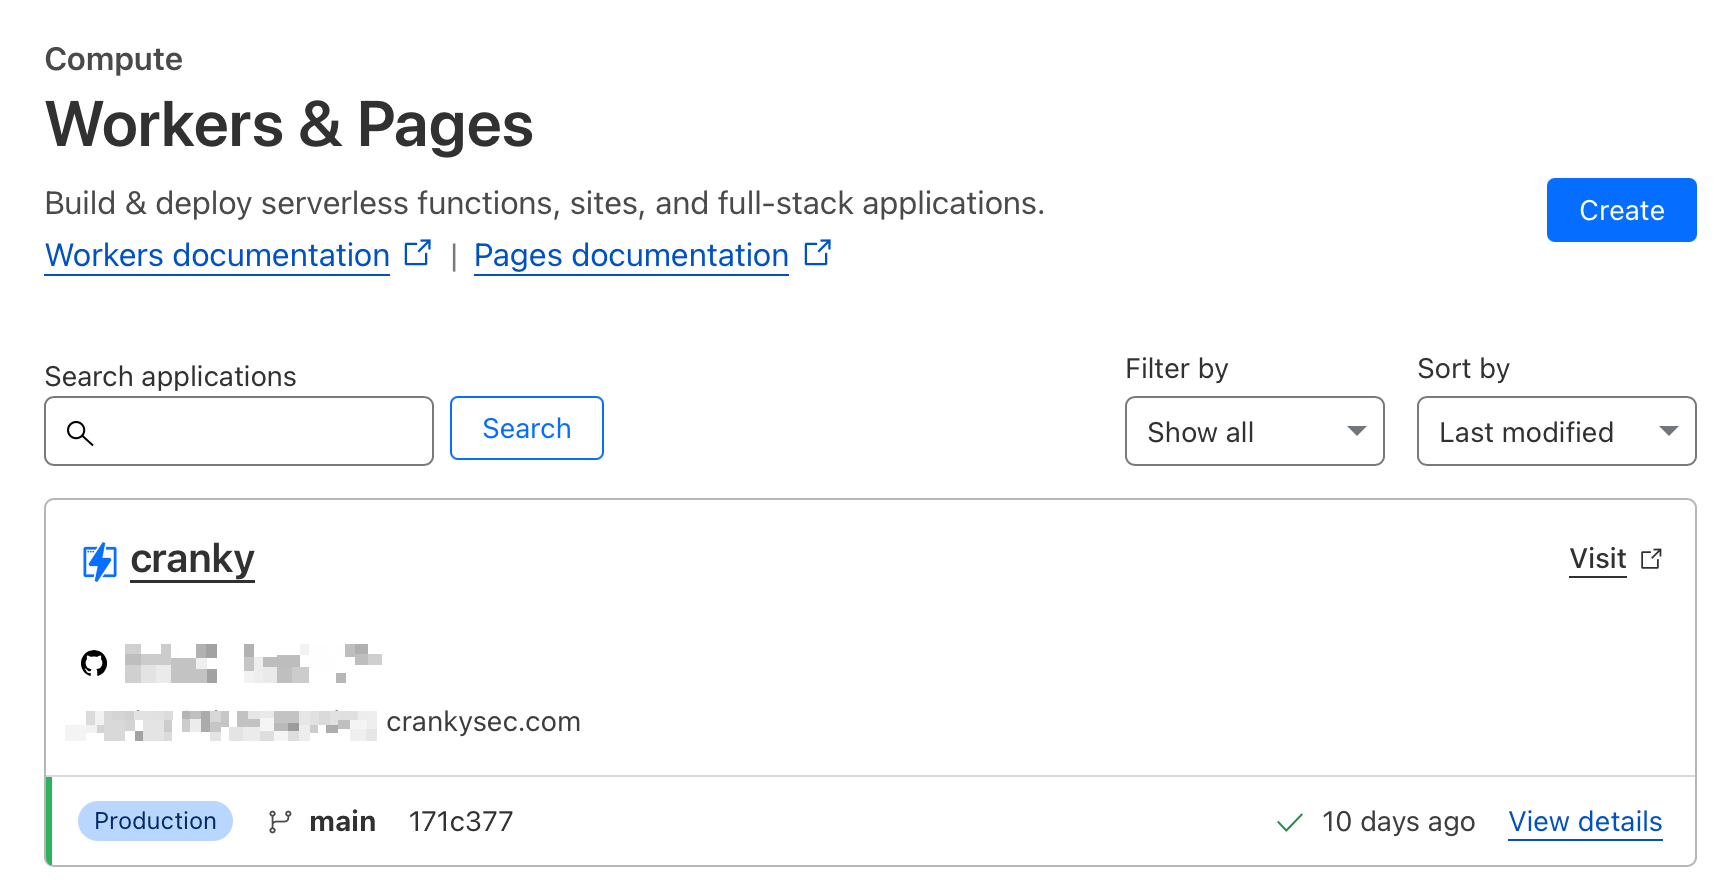
If you click "Visit", the link will take you to a *.pages.dev address that is generated automatically by Cloudflare. This is your blog's only URL if you don't have a domain.
If you didn't buy a domain, copy your *.pages.dev URL, and use that in eleventy.config.js.
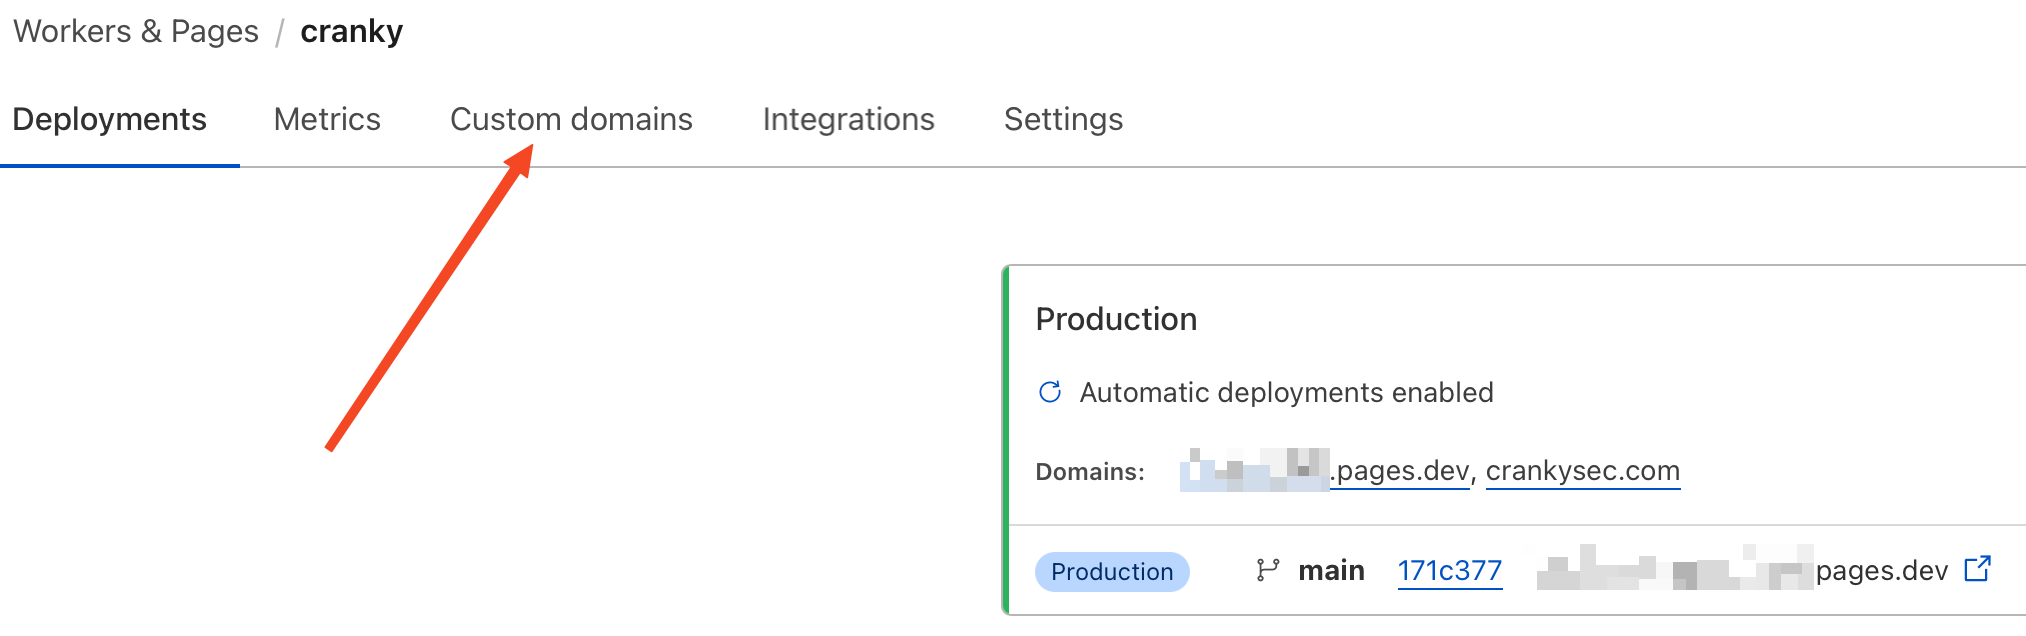
If you did buy a domain, pointing it to Cloudflare is pretty easy. Just click the link to your project:
Go to "Custom domains":
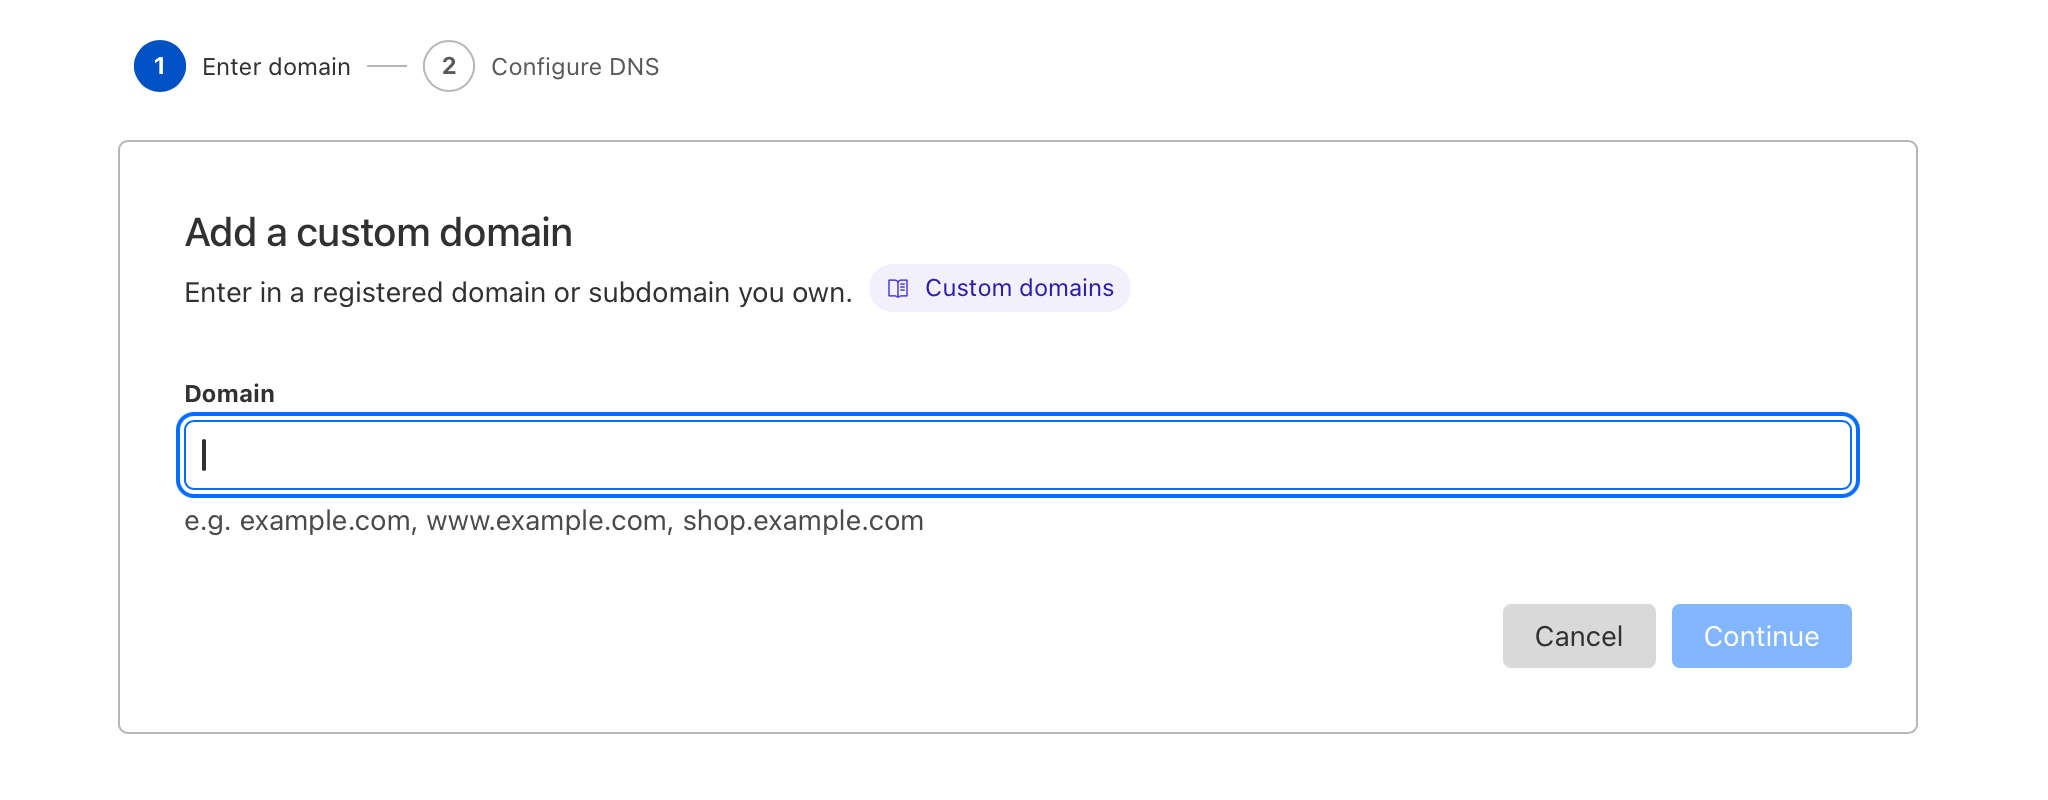
Click "Set up a custom domain"

Enter your domain (or subdomain):
If you set up your domain according to part I, all you need to do is activate the configuration:
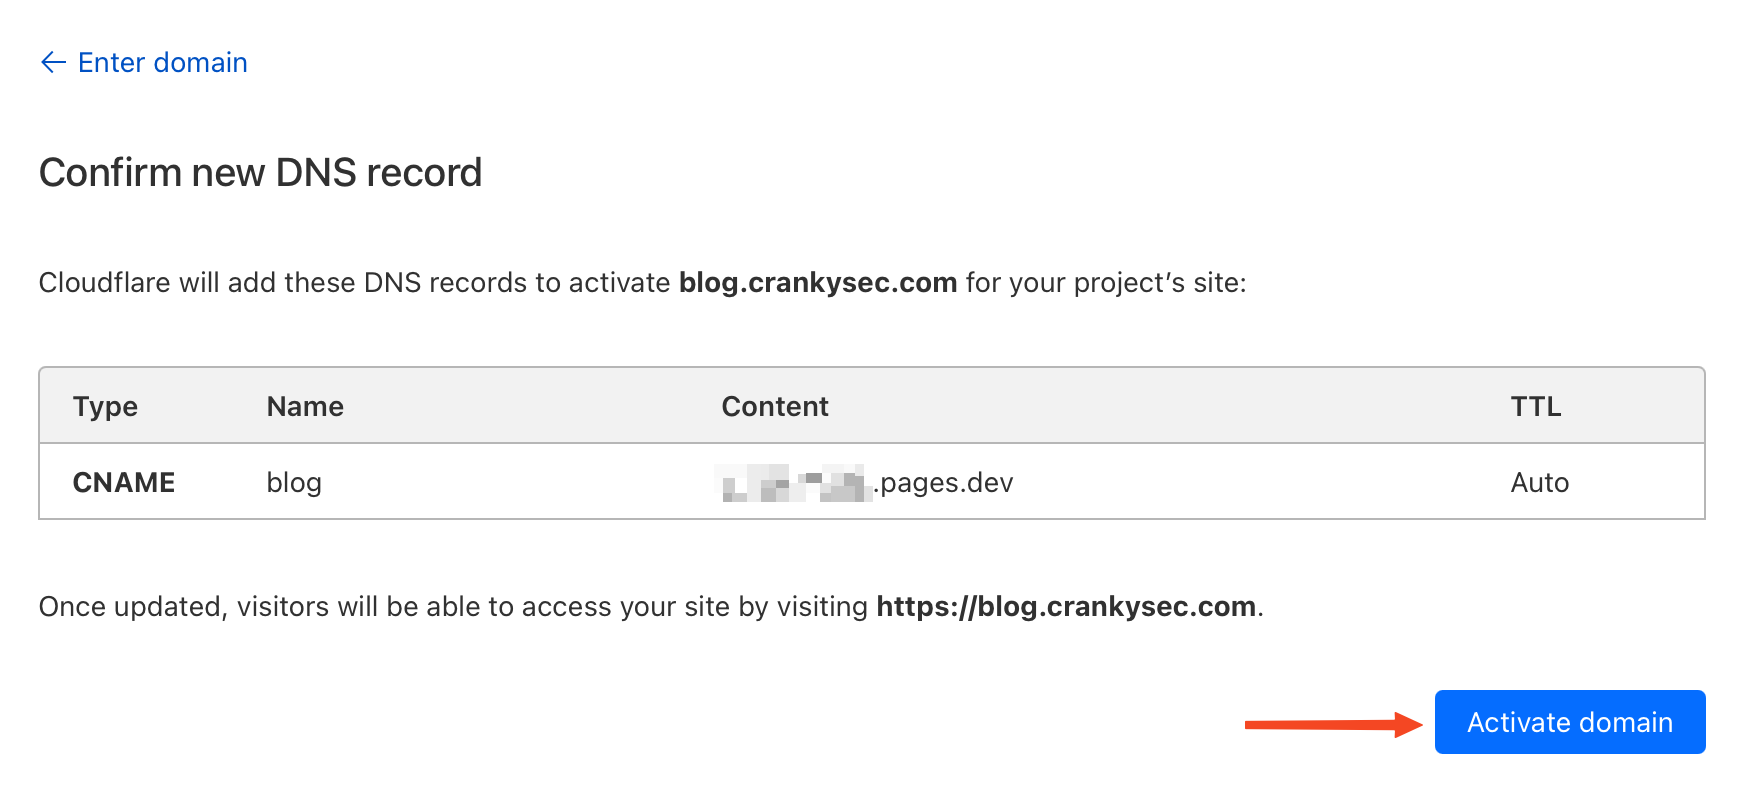
In this particular example, I am telling Cloudflare that I want the URL of this blog to be blog.crankysec.com. Since my domain crankysec.com is already handled by Cloudflare, we just need to click that button, and give it a minute. After a few, your blog will be at the URL you gave Cloudflare!
So, let's say you followed the instructions in part I , bought a domain and told Cloudflare to manage it. Let's say your domain is amazingdomain.org. You would enter blog.amazingdomain.org in the "Add custom domain", click "Activate domain", wait a little bit, and then go to https://blog.amazingdomain.org to see the fruits of your labor.
If you didn't buy a domain, you will have to settle for that address that looks like something-33.pages.dev. If you did buy a domain, but it's not managed by Cloudflare, you'll need to either transfer it to Cloudflare, or create a CNAME record pointing to your *.pages.dev with whoever manages your domain.
Now, it's only a matter of writing new blog posts in Markdown, saving the Markdown to the local content/blog directory, running
git add .
git commit -m "A commit message!"
git push
And waiting for Cloudflare to deploy your site! You should also take a look at Eleventy's documentation to see what else you can do with it! Send me a link to your blog, will ya?
That was a lot, but it was worth it! It took me like six hours to write this, but it shouldn't take you this long to get it done. As I've mentioned, this sounds and looks and reads way more complicated than it actually is. Just go for it. If you need any help at all, come visit our Discord and we'll try our best to sort you out! Don't need help? Come hang out anyway. Like this stuff? Tell your friends! Visit our store! Subscribe! Host your own stuff!
Stay tuned because we have more to come!


